Mon-Fri: 8am to 8pm
304 Trail One Burlington NC 27215
jon@bullcitycrawlspace.com
Mold and mildew are not just unsightly nuisances; they pose significant health risks and can cause substantial damage to buildings and personal belongings. Preventing mold and mildew growth is crucial for maintaining a healthy living environment and ensuring the structural integrity of your home or workplace. This blog aims to shed light on the importance of mold and mildew prevention, exploring the health implications, the impact on property, and effective strategies to keep these harmful fungi at bay.
Health Implications of Mold and Mildew
Mold and mildew can have serious health effects, especially for individuals with allergies, asthma, or weakened immune systems. These fungi release spores into the air, which can be inhaled, leading to respiratory issues, allergic reactions, and other health problems. Common symptoms include sneezing, coughing, skin rashes, and eye irritation. Long-term exposure can exacerbate chronic conditions and lead to more severe respiratory illnesses.
Impact on Property
Mold and mildew can cause extensive damage to buildings and their contents. They thrive in damp, humid environments, often spreading rapidly on organic materials such as wood, paper, and fabrics. Over time, mold can weaken structural elements, leading to costly repairs. It can also ruin furniture, clothing, and other personal items, creating additional financial burdens.
Effective Prevention Strategies
Control Moisture Levels: The key to preventing mold and mildew is controlling moisture. Use dehumidifiers, air conditioners, and proper ventilation to maintain low humidity levels, especially in basements, bathrooms, and kitchens.
- Repair Leaks Promptly: Fix any leaks in roofs, walls, or plumbing systems immediately to prevent water accumulation and mold growth.
- Ensure Proper Ventilation: Use exhaust fans in bathrooms and kitchens to expel moisture-laden air. Ensure that your home has adequate ventilation to allow for proper air circulation.
- Clean and Dry Damp Areas: Regularly clean and dry areas prone to moisture, such as shower curtains, bathroom tiles, and windowsills. Avoid leaving wet clothes or towels in piles, and dry them promptly.
- Use Mold-Resistant Products: When renovating or building, opt for mold-resistant products such as drywall, paint, and insulation. These materials are designed to prevent mold growth, offering an extra layer of protection.
- Monitor Indoor Humidity: Keep indoor humidity levels below 60%. Hygrometers can help you monitor and maintain appropriate humidity levels.
By understanding the importance of mold and mildew prevention and implementing these strategies, you can protect your health, preserve your property, and ensure a safe and comfortable living environment. Preventing mold and mildew is an ongoing process, but the benefits far outweigh the effort, contributing to a healthier and more resilient home or workplace.
Understanding Mold and Mildew
Mold and mildew are common household problems that can cause significant health issues and property damage if not addressed promptly. Understanding their nature, the conditions that promote their growth, and the types commonly found in homes is essential for effective prevention and management.
What are Mold and Mildew?
Definition and Characteristics:
- Mold: Mold is a type of fungus that thrives in warm, damp, and humid conditions. It reproduces by releasing spores into the air, which can settle on surfaces and begin to grow if the conditions are right. Mold typically appears as black, green, blue, or white patches that may be fuzzy or slimy in texture. It emits a musty odor, which is often the first sign of its presence.
- Mildew: Mildew is a specific type of mold that generally grows on flat, moist surfaces. It is often powdery and appears white, gray, or yellow. Mildew tends to grow in high-moisture areas, such as showers, windowsills, and other damp spaces.
Common Types Found in Homes:
- Cladosporium: This mold is commonly found indoors and outdoors and can thrive in both cool and warm conditions. It often appears on fabrics, carpets, and wooden surfaces.
- Penicillium: Known for its blue or green color, Penicillium is typically found on materials that have been damaged by water, such as wallpaper, insulation, and mattresses.
- Aspergillus: This mold is commonly found in house dust and grows on damp, organic materials like wood and paper products. Some species of Aspergillus can produce mycotoxins, which can be harmful to health.
- Stachybotrys (Black Mold): Often referred to as black mold, Stachybotrys thrives in conditions with constant moisture, such as leaks or flooding. It is particularly dangerous as it can produce mycotoxins that pose serious health risks.
Causes of Mold and Mildew Growth
Understanding the causes of mold and mildew growth is essential for effective prevention. The primary factors that contribute to their development include excess moisture, poor ventilation, and water damage.
Excess Moisture and Humidity:
- Mold and mildew require moisture to grow. High humidity levels, especially above 60%, create an ideal environment for their proliferation. Common sources of moisture include steam from showers, cooking, and even the breath of occupants.
- Prevention: Use dehumidifiers to maintain indoor humidity levels below 60%. Ensure that bathrooms, kitchens, and laundry rooms are well-ventilated to reduce moisture accumulation.
Poor Ventilation:
- Inadequate ventilation traps moisture inside homes, providing a conducive environment for mold and mildew growth. This is often a problem in basements, attics, and bathrooms where air circulation is limited.
- Prevention: Improve ventilation by installing exhaust fans in bathrooms and kitchens. Open windows and doors periodically to allow fresh air to circulate, and use fans to promote airflow in enclosed spaces.
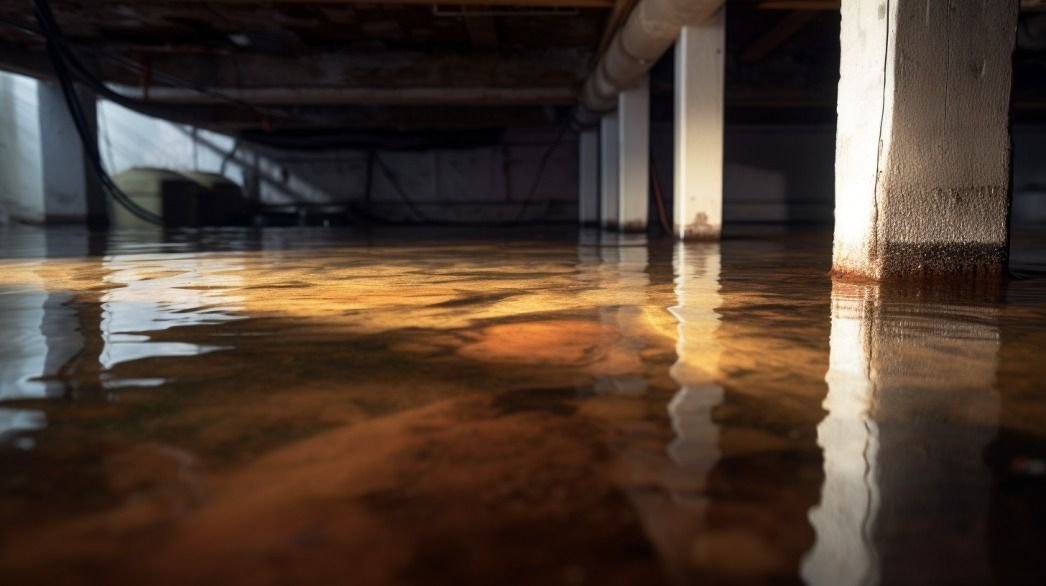
Leaks and Water Damage:
- Leaks from roofs, windows, pipes, and appliances can introduce significant amounts of water into the home. If not promptly addressed, these leaks can lead to persistent dampness, fostering mold and mildew growth.
- Prevention: Regularly inspect your home for leaks and repair them immediately. Pay attention to areas around sinks, tubs, and appliances that use water. Ensure that your roof and gutters are well-maintained to prevent water ingress.
By understanding what mold and mildew are, recognizing the conditions that promote their growth, and implementing preventive measures, you can effectively manage and reduce the risk of mold and mildew in your home. This proactive approach not only helps maintain a healthier living environment but also protects your property from potential damage.
Benefits of Moisture Barriers
Moisture barriers are an essential component in construction and renovation projects, offering a wide range of benefits that contribute to healthier living environments, structural integrity, and financial savings. This blog explores the various advantages of installing moisture barriers, focusing on health, structural, and financial benefits.
Health Benefits
Reduction of Allergens and Respiratory Issues:
- Decreased Allergens: Moisture barriers help prevent the accumulation of moisture, which is a key factor in the growth of mold, mildew, and dust mites. These allergens can trigger respiratory issues such as asthma, bronchitis, and allergic reactions. By keeping these allergens at bay, moisture barriers contribute to improved indoor air quality and overall respiratory health.
- Better Respiratory Health: Moist environments can lead to the proliferation of mold spores and other harmful microorganisms that, when inhaled, can cause respiratory problems. Moisture barriers effectively reduce the presence of these harmful agents, leading to fewer health issues for occupants, particularly those with pre-existing respiratory conditions.
Prevention of Health Problems Related to Mold Exposure:
- Reduced Mold Growth: Mold exposure can lead to a range of health problems, including skin irritation, eye irritation, nasal congestion, and more severe conditions like fungal infections and mycotoxin exposure. By preventing moisture accumulation, moisture barriers significantly reduce the risk of mold growth and the associated health risks.
- Healthier Living Environment: Consistently dry conditions created by effective moisture barriers ensure that the indoor environment remains safe and healthy for all occupants, reducing the risk of long-term health problems associated with mold and dampness.
Structural Benefits
Protection of Building Materials from Moisture Damage:
- Preservation of Materials: Moisture can cause significant damage to building materials such as wood, drywall, and insulation. It can lead to warping, rotting, and deterioration, compromising the structural integrity of a building. Moisture barriers protect these materials by preventing water ingress, thereby maintaining their strength and durability.
- Preventing Structural Weakness: Over time, moisture damage can weaken structural elements, leading to costly repairs and safety concerns. Moisture barriers help maintain the integrity of these elements, ensuring the building remains safe and sound.
Prolonged Lifespan of Structures:
- Longevity of Buildings: By protecting against moisture-related damage, moisture barriers extend the lifespan of buildings and structures. This not only ensures safety but also enhances the overall value and longevity of the property.
- Durability: Structures with effective moisture barriers are better equipped to withstand the test of time, reducing the frequency and extent of necessary maintenance and repairs.
Financial Benefits
Cost Savings on Repairs and Maintenance:
- Reduced Repair Costs: Moisture damage can lead to extensive and expensive repairs, including mold remediation, structural repairs, and replacement of damaged materials. Moisture barriers help avoid these costs by preventing moisture-related issues from occurring in the first place.
- Lower Maintenance: Buildings with moisture barriers require less maintenance related to moisture control, saving property owners both time and money over the long term.
Increased Property Value:
- Higher Market Value: Properties equipped with moisture barriers are more attractive to buyers and renters, as they are less likely to experience moisture-related problems. This can lead to a higher property value and a better return on investment.
- Enhanced Property Appeal: Knowing that a property has effective moisture protection measures in place can increase its marketability and appeal, giving it an edge in the competitive real estate market.
By understanding and leveraging the health, structural, and financial benefits of moisture barriers, property owners can create safer, more durable, and more valuable living and working environments. Investing in moisture barriers is a proactive step towards ensuring long-term benefits and peace of mind.
Preparation for Moisture Barrier Installation
Proper preparation is crucial for the successful installation of a moisture barrier. This step-by-step guide will help you assess moisture levels, gather the necessary tools and materials, and follow essential safety precautions to ensure an effective and safe installation process.
Assessing Moisture Levels
Before installing a moisture barrier, it's essential to assess the moisture levels in the area where the barrier will be installed. Identifying areas prone to moisture accumulation will help you address potential problems and ensure the barrier is effective.
Identifying Areas Prone to Moisture Accumulation:
- Inspect Vulnerable Areas: Pay special attention to basements, bathrooms, kitchens, and any areas below ground level. These spaces are more susceptible to moisture accumulation due to their proximity to water sources and limited ventilation.
- Check for Signs of Moisture: Look for visible signs of moisture such as water stains, mold, mildew, and damp or musty odors. These indicators can help you pinpoint areas where moisture control is most needed.
Using Moisture Meters and Hygrometers:
- Moisture Meters: Use a moisture meter to measure the moisture content in concrete floors and other materials. This tool provides precise readings, allowing you to identify areas with high moisture levels that need to be addressed.
- Hygrometers: A hygrometer measures the humidity levels in the air. Use this tool to monitor the overall humidity in the room, aiming to keep it below 60% to prevent mold growth and moisture problems.
Gathering Necessary Tools and Materials
Having the right tools and materials on hand is essential for a smooth and efficient installation process. Here’s a list of what you’ll need:
Essential Tools:
- Tape Measure: For accurately measuring the floor area and ensuring you have the correct amount of materials.
- Utility Knife: For cutting polyethylene sheeting and other materials to size.
- Staple Gun: For securing the moisture barrier to wooden surfaces if necessary.
- Caulking Gun: For applying sealant or caulk along seams and edges to ensure a tight seal.
Required Materials:
- Polyethylene Sheeting: The primary material for creating a moisture barrier. Ensure you have enough to cover the entire floor area with extra for overlaps.
- Liquid-Applied Barriers: Optional, but useful for providing an additional layer of moisture protection. These are applied with a trowel.
- Sealant or Caulk: For sealing seams and edges to prevent moisture penetration.
- Adhesive Tape: For reinforcing seams and securing overlaps in the polyethylene sheeting.
Safety Precautions
Safety should always be a priority during any installation process. Following these precautions will help ensure a safe working environment.
Personal Protective Equipment (PPE):
- Gloves: Protect your hands from cuts, abrasions, and contact with sealants and adhesives.
- Safety Glasses: Shield your eyes from dust, debris, and splashes from sealants or liquid barriers.
- Dust Masks: Prevent inhalation of dust and particles, especially when working in enclosed or poorly ventilated areas.
Ensuring Proper Ventilation During Installation:
- Ventilation: Proper ventilation is crucial when using adhesives, sealants, and liquid-applied barriers. Open windows and doors, and use fans to circulate fresh air throughout the work area. This helps to dissipate fumes and reduces the risk of respiratory irritation.
- Safe Handling of Materials: Follow the manufacturer’s safety instructions for handling and applying all materials. Ensure that any flammable materials are stored and used away from open flames and heat sources.
By thoroughly assessing moisture levels, gathering the necessary tools and materials, and adhering to safety precautions, you can ensure a successful and efficient moisture barrier installation. Proper preparation not only facilitates a smoother installation process but also enhances the effectiveness and longevity of the moisture barrier, providing lasting protection for your concrete floors.
Step-by-Step Installation Guide for Moisture Barriers
Installing a moisture barrier is a crucial step in protecting concrete floors from moisture damage. This step-by-step guide provides detailed instructions to ensure a successful and effective installation, from preparing the area to securing the barrier.
Step 1: Clean and Prepare the Area
Removing Existing Mold and Mildew:
- Using Mold and Mildew Cleaners: Begin by treating any existing mold or mildew with specialized cleaners. Apply the cleaner according to the manufacturer’s instructions, scrubbing the affected areas thoroughly to ensure all mold and mildew are removed.
- Ensuring the Area is Dry and Clean: After cleaning, ensure the area is completely dry. Use fans or dehumidifiers to expedite the drying process. A dry, clean surface is essential for the moisture barrier to adhere properly and function effectively.
Repairing and Smoothing the Surface:
- Fixing Cracks and Holes: Inspect the concrete floor for any cracks or holes. Use a concrete patching compound to fill in these imperfections. Follow the manufacturer’s instructions for mixing and applying the compound, ensuring it is level with the surrounding surface.
- Ensuring a Smooth, Even Surface: Once repairs are complete, check the entire floor to ensure it is smooth and even. Sand down any rough spots and clean away any dust or debris. A smooth, even surface will help the moisture barrier lay flat and adhere properly.
Step 2: Measure and Cut the Moisture Barrier
Measuring the Area:
- Accurate Measurement Techniques: Use a tape measure to determine the dimensions of the area to be covered. Measure both the length and width, and write down the measurements. For irregularly shaped areas, break the area into sections and measure each section separately.
- Allowing Extra Material for Overlaps: When calculating the amount of material needed, add an extra 2-3 inches to each dimension to allow for overlaps at the seams. This extra material is crucial for ensuring a continuous, effective barrier.
Cutting the Barrier:
- Using a Utility Knife for Precision: Lay the polyethylene sheeting on a flat surface. Using the measurements you recorded, mark the cutting lines with a pencil or chalk. Cut along the lines with a sharp utility knife, using a straightedge as a guide to ensure clean, straight cuts.
- Cutting Pieces to Fit the Specific Area: Cut the barrier into manageable pieces that fit the specific dimensions of the area. Ensure that each piece overlaps the adjacent piece by 2-3 inches to provide a continuous seal.
Step 3: Install the Moisture Barrier
Laying Out the Barrier:
- Positioning the Barrier Correctly: Start at one end of the room and unroll the polyethylene sheeting across the floor. Position each piece so that it overlaps the previous piece by 2-3 inches.
- Ensuring the Barrier Lays Flat Without Wrinkles: As you lay out the barrier, smooth it down with your hands or a broom to remove any wrinkles or bubbles. The barrier must lay flat to be effective.
Securing the Barrier:
- Using a Staple Gun or Adhesive: Secure the moisture barrier to the floor using a staple gun or adhesive. If using a staple gun, place staples at regular intervals (every 6-12 inches) along the edges and seams. If using adhesive, apply it according to the manufacturer’s instructions.
- Placing Staples at Regular Intervals: Ensure that staples are evenly spaced to provide a secure hold without causing the barrier to bunch up or wrinkle.
Sealing the Edges and Seams:
- Applying Caulk or Sealant Along Seams: Apply a continuous bead of caulk or sealant along the seams where the barrier pieces overlap. This will help prevent any moisture from seeping through the seams.
- Using Tape to Secure Overlaps: After applying the caulk or sealant, use adhesive tape to reinforce the seams. Press the tape down firmly to ensure a tight bond and smooth out any air bubbles.
By following these detailed steps, you can ensure a successful moisture barrier installation that effectively protects your concrete floors from moisture damage. Proper preparation, accurate measurement, and careful installation are key to achieving a durable and reliable moisture barrier.
Post-Installation Maintenance
Maintaining the integrity of your moisture barrier is essential to ensuring its long-term effectiveness in protecting your concrete floors from moisture-related damage. Post-installation maintenance involves regular inspections and prompt addressing of any issues that arise. This guide outlines the best practices for maintaining your moisture barrier, keeping your floors safe and dry.
Regular Inspections
Regular inspections are critical for early detection of potential problems with your moisture barrier. Scheduled checks help identify signs of mold, mildew, or breaches in the barrier, allowing for timely intervention.
Scheduled Checks for Signs of Mold or Mildew:
- Set a Schedule: Establish a regular inspection schedule, ideally every three to six months. Consistent monitoring is crucial for early detection of mold or mildew.
- Look for Visible Signs: During inspections, look for any visible signs of mold or mildew on the floor surface and surrounding areas. This includes discoloration, musty odors, or the presence of mold spores.
- Use Moisture Meters: Utilize moisture meters to check the moisture levels in and around the concrete floor. Elevated moisture levels can indicate a breach or failure in the barrier, necessitating further investigation.
Inspecting Seams and Edges for Any Breaches:
- Focus on Seams and Edges: Pay special attention to the seams and edges of the moisture barrier. These areas are more prone to breaches and should be inspected thoroughly.
- Check for Wear and Tear: Look for signs of wear and tear, such as peeling tape, cracked sealant, or visible gaps. Even minor breaches can compromise the barrier's effectiveness.
- Inspect Under Furniture and Appliances: Moisture can accumulate under heavy furniture or appliances. Move these items periodically to inspect the barrier beneath them.
Addressing Issues Promptly
Timely addressing of any issues found during inspections is vital to maintaining the effectiveness of your moisture barrier. Prompt repairs and reapplications of sealant prevent minor problems from escalating into significant damage.
Repairing Any Damage to the Barrier:
- Identify the Source of Damage: Determine the cause of any damage to the moisture barrier. Common sources include foot traffic, sharp objects, or shifting of heavy furniture.
- Patch and Repair: For small breaches, patch the damaged area using a piece of polyethylene sheeting and adhesive tape. Ensure the patch overlaps the damaged area by at least 2-3 inches on all sides. For larger areas, consider replacing the affected section of the barrier.
- Ensure a Tight Seal: After repairing, press down the patch or new section firmly to ensure a tight seal. Use a roller if necessary to remove any air bubbles and ensure a smooth finish.
Reapplying Sealant as Necessary:
- Inspect Existing Sealant: Check the condition of the sealant along seams and edges during your regular inspections. Look for signs of cracking, peeling, or deterioration.
- Clean the Area: Before reapplying sealant, clean the area thoroughly to remove any dirt, dust, or debris. This ensures the new sealant adheres properly.
- Apply Fresh Sealant: Apply a fresh bead of caulk or sealant along the seams and edges where needed. Use a caulking gun for precise application and smooth the sealant with a caulk smoothing tool or your finger to ensure a continuous, even seal.
By following these post-installation maintenance practices, you can extend the life and effectiveness of your moisture barrier, protecting your concrete floors and maintaining a healthy indoor environment. Regular inspections and prompt repairs are key to preventing moisture-related issues and ensuring the longevity of your flooring system.
FAQs
Contact Bull City Crawlspace Today!
Bull City Crawlspace will do everything we can to ensure your experience with us is excellent.
Request A FREE Estimate
Request a Free Estimate Form
Checkout Recent Post


Got a Question? We’re Here to Help.
You can arrange an appointment or make an enquiry by phone or email, orget in touch to us via our contact form.
Business Hours:
Monday - Friday 8:00 AM - 8:00 PM Saturday and Sunday: Closed
We're your local family owned, operated and licensed crawl space repair and waterproofing company.
919-724-4601
jon@bullcitycrawlspace.com
Services
NATIONWIDE LEADER
Claim you free crawl space consultation today by clicking the button below.
Contact Info
Business Hours:
Mon to Fri: 8:00am - 8:00pm